![]()
How to get access to PL-LAB resources?
In order to use PL-LAB resources it is required to create an account in Fed4FIRE and obtain proper credentials. To this end please follow the instructions posted at http://doc.fed4fire.eu/getanaccount.
How to interact with PL-LAB SFA/Aggregate Manager?
For detailed information on the PL-LAB AM deployment, including relevant URLs and RSpecs for PL-LAB resources please refer to PL-LAB RSpec description.
How to run experiments in PL-LAB?
PL-LAB resources can be reserved, configured and accessed using the jFed Experimenter GUI application that can be downloaded from http://jfed.iminds.be.
Please refer to http://doc.fed4fire.eu/firstexperiment for initial information on how to obtain jFed and use it, together with valid Fed4FIRE credentials, to setup a simple experiment in any of the Fed4FIRE testbeds.
PL-LAB offers five types of resources listed at http://www.pllab.pl/fed4fire/rspecs/. These can be selected in the jFed graphical topology editor by dragging one of the icons (Generic Node, Physical Router or Programmable Switching Devices) and choosing the PL-LAB testbed from the drop down list. Selected nodes may be further connected with links for which capacity value may be specified to form a complete experiment network.
How to run basic experiment on PL-LAB?
Please follow the steps of the tutorial.
What type of resources does PL-LAB offer for experiment?
Servers
Several types of servers are available in PL-LAB with different providers and hardware configuration. The experimenter gets an exclusive access to the whole physical machine.
Juniper MX Routers>
Two models of Juniper routers are available: MX80 and MX240. A subset of 8 ports can be used within an experiment. The experimenter gets an exclusive access to the whole physical router.
EZAppliance NP
Enables access to EZchip NP-3 processor which provides a set of instructions specialized for handling frames, including filtering, modification, look-up and forwarding functions. The experimenter is required to develop and compile the control software using his own tools and upload the executables to the EZAppliance for execution.
NetFPGA cards
Experimenter gets exclusive access to a physical server with a single NetFPGA card (Virtex2 or Virtex5) installed.
Spirent tester
The PL-LAB’s Spirent tester is an efficient hardware solution that enables network testing and emulation. It provides dedicated graphical user interface to manage experiments. It supports emulation of network and application protocols (IGMP, HTTP, FTP etc.) end elements (hosts/routers). Spirent tester is equipped with four 1Gbps network interfaces.
General information:
– Chassis version: SPT-2000
– Card (test module): CM-1G-D4 (Hypermetics CM 10/100/100 4 ports)
– Firmware version (test package): 3.80.6646
Available licenses: Packet generator and analyzer, IGMP, MLD, HTTP, FTP, IPTV, Avalanche base package, SIP/RTP/RTCP, Avalanche Video Quality Analyzer and Avalanche Scalable Application Protocol Emulation Engine (SAPEE).
How to setup simple experiment with PL-LAB Spirent traffic generator?
Spirent can be included in an experiment network by selecting the Generic Node icon, PL-LAB testbed and further specific node named “mb0.pw”.
Once the experiment network is provisioned Spirent is not accessed in the same way as other devices (simple double-click on the provisioned node in jFed editor to start SSH connection) but a separate Putty session needs to be established that allows authorized user access to a dedicated Spirent gateway machine and subsequent Spirent GUI Application connection to the Spirent chassis.
Follow these steps to access and control provisioned Spirent device with dedicated GUI application:
1. Download, extract and install the registry entries (user Windows machine) containing template configuration of a Putty session from here.
2. Open Putty and load saved session named f4f-user@pllab-spirent-1.
3. Go to Connection->Data settings and replace template user name with your user name from Fed4FIRE account.
4. Go to Connection->Proxy settings and replace template proxy user name with user name configured on the PL-LAB Proxy (available at jFed->RSpec Viewer->Node login information section).
5. Open Putty session. After successful connection the following banner should be displayed. Please note that this sessions needs to remain open.
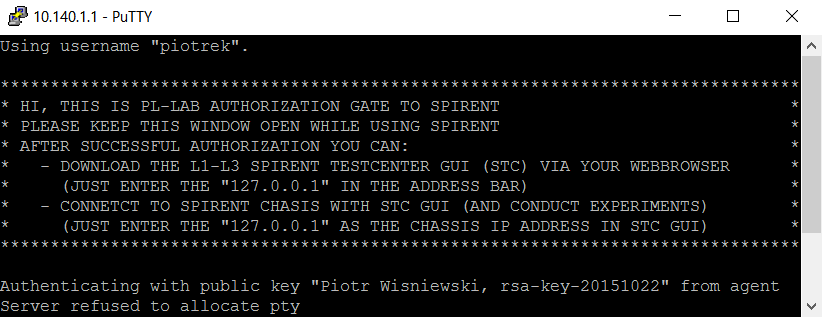
6. Follow the instructions displayed on the banner to download the Spirent Testcenter GUI from the Spirent chassis and run experiments.
How to get more information?
You can contact us by sending an email to pllab-fed4fire-operator@lists.man.poznan.pl.